INTRO
JavaScript is a procedural web development language used together with HTML & CSS, providing interactable dynamic webpage supports. Currently, JavaScript has a range of use in data processing, application development, and more.
This document focuses on JavaScript application in web development, thus only introduces crucial fundamental concepts while ignoring irrelevant.
Interpreted Language
There are two different categories of program languages based on its execution: compiled language and interpreted language.
Source code written in English needs to be translated to binary computer language for the computer to understand. The compiler is responsible for the translation, and its best examples are C/C++ language. On the other hand, the interpreter executes code without translation but has a drawback on a slower speed.
JavaScript is the interpreted language, and the code runs equivalently despite running on a different system as long as it has the interpreter (aka. cross-platform).
Hypertext Markup Language
Hypertext Markup Language (HTML) is a declarative web design language commonly used to generates a static website. A static website always shows the same content to website visitors. Meaning, HTML alone is not enough to provide various interfaces and features.
However, this document highly recommends learning HTML before learning JavaScript. JavaScript alone can design a webpage but is an inconvenient and inefficient task. It is conventional to create a webpage with HTML first then add interfaces and features using JavaScript.
Below is an example of HTML:
<html>
    <!-- HTML 주석 -->
    <body style="text-align: center">
        <span class="example">Hello World!</span>
    </body>
</html>
Cascade Style Sheets
Cascade Style Sheets (CSS) scripting language that assists HTML by styling HTML elements such as tag, id, class, and more. CSS is another simple language worth studying when learning HTML.
Below is an example of CSS:
body {
    background-color: rgb(42, 45, 46);
    border: solid 3px black;
}

.example {
    font-family: 'Consola', monospace;
    color: white;
}
EXECUTE
Only an internet browser is needed to execute JavaScript: Microsoft Edge, Google Chrome, Mozilla FireFox, Apple Safari, and more can run JavaScript.
The .js extension file alone cannot run JavaScript on an internet browser but only shows the script in text. Node.js program can execute JavaScript without a browser, though this document intends to introduce JavaScript for the beginner. Hence, this chapter focuses on setting up a simple JavaScript workspace that runs on an internet browser.
Visual Studio Code
Visual Studio Code (VS Code) is a free source code editor developed by Microsoft. Since Microsoft has developed and is promoting TypeScript, a superset of JavaScript, VS Code also significantly supports JavaScript development environment along with TypeScript.
VS Code needs three files to configure a JavaScript workspace: JavaScript, HTML, and JSON file.
script.js File
A JavaScript file is for test and experiment with your JavaScript experience. This document named the file as script.js.
index.html File
An HTML file provides a runtime environment for executing JavaScript. If the JavaScript file is script.js, create a HTML file as index.html and write the code as follows:
<html>
    <!-- LOAD "script.js" JAVASCRIPT FILE -->
    <script type="text/javascript" src="script.js"></script>
</html>
.vscode/launch.json File
Run JavaScript on VS Code using an extension. To install the extension, press the F1 key and select Extensions: Install Extensions. Search for the preferred browser:
- Google Chrome:
Debugger for Chrome - Mozilla FireFox:
Debugger for FireFox - Microsoft Edge:
Debugger for Microsoft Edge
Install the extension by clicking the green Install button. Pressing the F5 key will show a list of options to run JavaScript, including the selected browser, and automatically generates .vscode/launch.json file.
Add the following configuration to the JSON file: "file": "${workspaceFolder}/index.html". Don’t forget to place a comma when adding a new value to JSON. Below is the launch.json file for the Microsoft Edge browser.
{
    "version": "0.2.0",
    "configurations": [
        {
            "type": "edge",
            "request": "launch",
            "name": "Launch Edge against localhost",
            "url": "http://localhost:8080",
            "file": "${workspaceFolder}/index.html"
        }
    ]
}
Eventually, a JavaScript environment on VS Code would look like this:

There are two different methods when running JavaScript on VS Code: Run with debugging (F5) and run without debugging (Ctrl+F5). Use the debugging mode when the program encounters an error to identify the cause, but run without debugging when executing in general.
BASIC
Every programming language has its own rules to be observed and fundamental data that works as a basis of the program. Failed to observe this causes either error or unexpected results. As for the beginning of the practical coding, this chapter will introduce basic knowledge of JavaScript language coding.
The JavaScript documents also introduce newly added syntax since the release of ECMAScript 2015, also known as ES6, that is a standardization for script-language.
<script> Tag
HTML requires the <script> tag to implement JavaScript; either write JavaScript or load external JavaScript file using the <script> file:
<!-- WRITING JAVASCRIPT -->
<script type="text/javascript">
	Write JavaScript Here...
</script>

<!-- LOADING JAVASCRIPT -->
<script type="text/javascript" src="path/to/script.js"></script>
Comment
Comment in a programming language is not executed and is commonly used to write down information related to the programming on source codes. There exist two comments in JavaScript: line comment and block comment.
-
- Line comment
- a comment worth a single line of code, declared by
//.
-
- Block comment
- a comment with multiple lines of code, declared by
/* */.
/*
BLOCK COMMENT:
multiple lines of comment can be placed here.
*/
// LINE COMMENT: for a single line of code.
Output
JavaScript has two different outputs:
| OUTPUT | SYNTAX | DESCRIPTION |
|---|---|---|
document.write() |
document.write("text") |
Write a text on HTML directly; not recommended as it affects webpage design. |
console.log() |
console.log("text") |
Print text on a terminal; press the F12 key on a browser and check the “Console” tab. |
To print a mixture of more than a single data type in output functions, there are two possible methods with slightly different results.
-
Using a comma
,can list the data in sequence but always places blank space on each comma.console.log("Hello World!", 1);Hello World! 1 -
Concatenation of string using
+and does not create blank space.console.log("Hello World!" + 1);Hello World!1
Pop-up Box
JavaScript has three different pop-up boxes for HTML:
| POP-UP | SYNTAX | DESCRIPTION |
|---|---|---|
alert() |
alert("description") |
A pop-up box with "description" with an OK button. |
prompt() |
prompt("description","value") |
A pop-up box with "description" with input form with "value" as default. |
confirm() |
confirm("description") |
A pop-up box with "description" with both OK and Cancel button that returns True and False. |
Identifier
An identifier is a name used to identify data in programming. In other words, it is just a user-defined name. JavaScript has the following rules when naming an identifier:
- Only alphabet, number, underscore
_, and dollar sign$is allowed. - First letter cannot start with a number.
- Blank space is prohibited.
Variable
Variable is a container for data that can be assigned using the assignment operator =. Starting from ECMAScript 2015, there are three different types of variables.
| VARIABLE | EXAMPLE | DESCRIPTION |
|---|---|---|
var |
var x = value; |
Global variable |
let |
let x = value; |
Local variable |
const |
const x = value; |
Unchangeable local/global variable |
A declared variable does not need var, let, or const keyword when using. A variable in JavaScript can have any data type (ex. number, text, and more) assigned wherever and whenever.
Initialization
Initialization is the first assignment to a variable where it commonly occurs in the definition process.
// VARIABLE INITIALIZATION
let variable = 1
Local & Global Variable
There are two types of variable in JavaScript:
-
Local variable is a variable defined within the code block, such as functions and classes. A local variable releases data when escapes from the code block and unavailable to use outside. It may have the same name as other variables defined outside the code block.
  /* LOCAL VARIABLE "let" */
  let y = "Outer Scope";
  if (true) {
      let y = "Inner Scope";
      console.log(y);
  }
  console.log(y);
Outer Scope Inner Scope -
Global variable is a variable that does not belong to any code blocks within the script. A global variable can be used with local variables inside other code blocks without any special syntax. Be cautious when using a global variable as it can cause an error related to variable confliction.
  /* GLOBAL VARIABLE "var" */
  var x = 123.456;
  console.log(x);

  x = "This is a string.";
  console.log(x);
123.456 This is a string
Constant
A constant variable is a variable that cannot change its value after initialization. Constant in JavaScript becomes a local and global variable depending on declared location: local variable when declared inside a code block, but global variable otherwise.
Data Type
There are three categories of data in Python: numeric, boolean, and string data type.
Numeric Data Type
While most of the programming language (such as C++, Java, and Python) have numerical data type of more than one in general. However, JavaScript only has one number numeric data type that can store both integer and floating-point numbers.
The arithmetic operation for a number data type is as follows:
| NAME | OPERATOR | DESCRIPTION |
|---|---|---|
| Addition | + |
- |
| Subtraction | - |
- |
| Multiplication | * |
- |
| Division | / |
- |
| Modulus | % |
Returns a remainder of the division. |
The assignment operator is a combination of an arithmetic and an assignment symbol =, making numerical calculation code written more concisely.
| OPERATOR | EXAMPLE | EQUIVALENT |
|---|---|---|
+= |
x += 1 |
x = x + 1 |
-= |
x -= 1 |
x = x - 1 |
*= |
x *= 1 |
x = x * 1 |
/= |
x /= 1 |
x = x / 1 |
%= |
x %= 1 |
x = x % 1 |
Although not an assignment operator, the similar increment and decrement operator has identical meaning as follows:
| OPERATOR | EXAMPLE | DESCRIPTION |
|---|---|---|
++ prefix |
x = y++ |
x = y; y = y+1; |
++ suffix |
x = ++y |
y = y+1; x = y; |
-- prefix |
x = y-- |
x = y; y = y-1; |
-- suffix |
x = --y |
y = y-1; x = y; |
Boolean Data Type
A boolean data type is useful for a code that requires logical condition whether the statement is true or false.
| VALUE | NAME | DESCRIPTION |
|---|---|---|
True or 1 |
Logically true | Returned when logic is true. |
False or 0 |
Logically false | Returned when logic is false. |
An integer value can substitute boolean logic values; any non-zero numbers represent True, while False is only expressed by zero.
A comparison operator is used to compare the relation of two values, returning corresponding boolean data type depending on whether the condition holds or not.
| OPERATOR | DESCRIPTION |
|---|---|
< |
Lesser than |
<= |
Lesser than or equal to |
> |
Greater than |
>= |
Greater than or equal to |
== |
Equal to |
=== |
Identical (value & type) |
!= |
Not equal to |
The === operator is stricter than the == operator by evaluating whether both value and type matches.
Meanwhile, the boolean data type can be added, multiplied, and complemented as follows:
| OPERATOR | LOGIC | DESCRIPTION |
|---|---|---|
&& |
AND | True when all the arguments are True, else False. |
|| |
OR | True when at least one argument is True, else False. |
! |
NOT | Changes True to False and vice versa. |
String Data Type
A string data type is text-based data that is distinguished by a pair of single quotation marks '' or double quotation marks "". To place a quotation mark within a string object, insert a backslash \ before the quotation mark to prevent the premature ending of the string.
// COMPARISON BETWEEN IMPROPER AND PROPER WAY OF TYPING STRINGS.
console.log('Where's my "Cat in the Hat" book?');
console.log('Where\'s my "Cat in the Hat" book?');
Where
Where's my "Cat in the Hat" book?
String data changes to a new line by inserting an escape character \n as shown below:
console.log("Hello\nWorld!");
Thank you!
You're welcome.
Previously, the only way to concatenate other data to a string data was by using the addition operator +. Starting from ES6, however, JavaScript provides template literal that can insert data in ${} without dividing an existing string data.
/* BEFORE ES6 */
let variable = 6;
let text = "This is before ES" + variable + "!";
console.log(x);

/* AFTER ES6 */
let variable = 6;
let text = `This is after ES${variable}!`
Escape Character
Escape character \ is used to escape from a sequence of characters and execute certain operations within text-based data. In the introduction on string data type, \n is used to change to a new line.
| New line | Horizontal tab | Backslash | Backspace | Single quote | Double quote |
|---|---|---|---|---|---|
\n |
\t |
\\ |
\b |
\' |
\" |
CONDITIONAL AND LOOP
Conditional and iteration (or loop) statements are two of the most commonly used in programming. The “statement” in programming represents a code that executes or processes data. This chapter introduces a list of conditional and iteration statements in Python programming.
if Statement
Conditional if statement runs code if the condition holds. When the condition evaluates True, the indented codes are carried out but otherwise ignored.
if (condition)
{
    statements;
}

// SIMPLIFIED STATEMENT
if (condition) statement;
else Statement
A conditional else statement cannot be used alone and must be followed by an if condition. The statement contains code that executes when evaluated False.
if (condition)
{
    statements;
}
else
{
    statements;
}
else if Statement
A conditional else if statement is a combination of else and if conditions; when the first condition evaluates false, the else if statement provides a new condition different from the previous one.
if (condition)
{
    statements;
}
else if (condition)
{
    statements;
}
else
{
    statements;
}
However, this statement is different from the chain of else-if conditional statement as that is a combination of two sets of conditions. On the other hand, else if conditional statement is a continuation of an existing evaluation instead of starting new conditioning.
Ternary Operator
A conditional statement can be simplified using the ternary operator shown below:
condition ? true_return : false_return;
The vocabulary ternary indicates the statement takes three arguments. The ternary operator should not be overused as it reduces readability but useful on variable assignment.
switch Statement
Conditional switch statement evaluates whether a variable matches a value assigned to the case keyword and executes the corresponding code if true. After execution, the break statement must locate to prevent further evaluation of the next case keyword.
If no condition matches, the statement automatically executes codes under the default keyword that is optional. The default keyword does not require the break statement as opposed to the case keyword.
switch (argument) {
    case value1:
        statements;
        break;
    case value2:
        statements;
        break;
    default:
        statements;
}
Multiple case keywords may share the same code as follows:
switch (argument) {
    case value1:
    case value2:
    case value3:
        statements;
        break;
    case value4:
    case value5:
    case value6:
        statements;
        break;
    default:
        statements;
}
break Statement
The break statement is to end a loop prematurely. When encountered in the loop, the break statement escapes from the current loop but does not escape from the nesting loop.
continue Statement
The continue statement skips the rest of the code below in the loop and jumps back to the conditioning part. It maintains the iteration rather than escaping from it like the break statement.
while Loop
A while loop statement repeatedly executes statements inside (aka. iterate) as long as the condition holds. The loop ends once the condition evaluates False.
while (condition)
{
    statements;
}

// SIMPLIFIED STATEMENT
while (condition) statement;
do-while Statement
The do-while loop statement is similar to the while loop statement, but the former executes code first then evaluates, and the latter is vice versa.
do
{
    statements
} while (condition);
for Loop
The for loop statement repeatedly executes statements inside (aka. iterate) as long as the condition holds. Its local variable changes as specified on each iteration, which commonly uses integer increment.
for (variable; condition; increment) {
    statements;
}

// SIMPLIFIED STATEMENT
for (variable; condition; increment) statement;
Ranged-based for Loop
ES6 standardization introduces two different ranged-based for loop: for-of and for-in. The functionality is similar, but the passed argument and data aren’t the same.
The for-of loop enumerates array data and passes a value of the element.
for (let i of [1, 2, 3]) {
    console.log(i);
}
1
2
3
Meanwhile, the for-in loop enumerates object data and passes a key (properties name) of the element instead.
for (let i in {a:1, b:2, c:3}) {
    console.log(i);
}
a
b
c
The concept of an array and object in JavaScript will be explained in later chapters.
ITERABLE
JavaScript has an iterable object that stores the collection of data. An array and string mentioned above is also an iterable object built inside JavaScript. This chapter describes the most commonly used iterable object called an array.
Array
An array is a container for data of the same data type in sequence. Assign values in order within a pair of bracket [] to initialize an array:
/* ARRAY DECLARATION */
var arr = [value1, value2, value3];
Alternatively, placing values in the Array() constructor will also create and initialize an array.
/* ARRAY DECLARATION USING CONSTRUCTOR */
var arr = new Array(value1, value2, value3);
The Array() constructor can create an empty array with a defined size by placing an integer. However, this may not be necessary as JavaScript’s array shrink and expand anytime.
/* EMPTY THREE-LENGTH ARRAY DECLARATION */
var arr1 = new Array(3);

/* EMPTY ZERO-LENGTH ARRAY DECLARATION */
var arr2 = new Array();
var arr3 = [];
Spread Operator
Spread operator ... is placed before an array to enumerate elements within rather than calling the array itself.
let arr = [value1, value2, value3];

console.log(arr);
console.log(...arr);
Array [value1, value2, value3]
value1, value2, value3
Additionally, the spread operator can also assign the remaining data, as shown in the section Destructuring Array.
Array Destructuring
Destructuring an array is a process of assigning elements in an array to individual variables.
let arr = [value1, value2, value3, value4, value5];

/* ARRAY DESTRUCTURING */
let [variable1, , ...variable3] = arr;

// THEREFORE...
console.log(variable1);
console.log(variable3);
value1
Array [value3, value4, value5]
Associative Array
JavaScript does not support associative array where strings index an array instead of integers, like a dictionary in Python. Although there is a way to do it, it is not recommended and advise on using an object instead.
var arr = [];

/* ARRAY "arr" IS NOT AN ARRAY ANYMORE AND IS CONVERTED TO AN OBJECT */
arr['property1'] = value1;
arr['proprety2'] = value2;

// THEREFORE, METHOD FOR AN ARRAY IS NOT AVAILABLE!
console.log(arr.length);
0
FUNCTION
Functional programming is a style of program scripting that is based mostly on the usage of functions. This chapter will be introducing the guide on how to create and use functions in Python for functional programming.
Function
A function is a reusable independent block of code that can process the data and present newly processed data once it’s called, allowing dynamic program scripting. A function is distinguished by parenthesis after its name; function().
/* BEFORE ES6 */
function functionName() {
	console.log(4)
}

/* AFTER ES6 */
const functionName = () => {
    console.log(4);
}

// CALLING FUNCTION
functionName();
4
ES6 syntax is especially useful when creating a simple in-line function.
/* A FUNCTION DEFINED ONLY USING A SINGLE LINE (ES6). */
const functionName = (arg) => console.log(arg);
functionName(value);

/* IMPLEMENTATION ON ARRAY ENUMERATION (ES6). */
let arr = [1, 2, 3, 4];
arr.forEach(arg => {console.log(arg*2);} );
Parameter & Argument
Following is a difference between parameter and argument mentioned when discussing function:
-
- Argument
- An argument is a value or object passed to a function parameter.
-
- Parameter
- A parameter is a local variable assigned with an argument. Meaning, parameters are only available inside the function.
Although parameters and arguments are a different existence, two terms are used interchangeably as both stores the same data.
| OPERATOR | SYNTAX | DESCRIPTION |
|---|---|---|
= |
arg=value |
A parameter that has default value when no argument is passed. Must locate after normal parameter. |
Examples below show how parameter and argument work in function:
/* BEFORE ES6 */
function functionName(arg1 = value1, arg2 = value2) {
    console.log(arg1 + arg2);
}

/* AFTER ES6 */
const functionName = (arg1 = value1, arg2 = value2) => {
    console.log(arg1 + arg2);
}

// CALLING FUNCTION
functionName(2,3);
5
Rest Parameter
The rest parameter is a parameter with the spread operator, able to accept more than one argument as an array. If there is no argument, the rest parameter becomes an empty array.
/* FUNCTION WITH REST PARAMETER */
function functionName(arg1, ...rest) {
	for(let variable of rest){
    	statements;
    }
}
return Statement
The return statement is a function-exclusive statement that returns the value processed by a function. Once encountering a return statement, the function ends immediately despite having remaining codes. The return statement is not essential, which returns undefined if not present.
/* BEFORE ES6 */
function functionName(arg1 = value1, arg2 = value2) {
    return arg1 + arg2;
}

/* AFTER ES6 */
const functionName = (arg1 = value1, arg2 = value2) => {
    return arg1 + arg2;
}

console.log(functionName(2,3));
5
OBJECT
Object-oriented programming (abbrev. OOP), one of the programming style, focuses on the usage of classes and objects instead of functions. This chapter will be introducing how to create a custom object and use it to achieve OOP in JavaScript.
Object
Previous chapters introduced a variable and function, which is for storing and processing data, respectively. Object (aka. instance) is a block of data that encapsulates these variables and functions into a single identity.
Encapsulation is the core concept in an object with the following characteristics:
- Combines variables and functions into a single data.
- Restrict direct access to these variables and functions to prevent accidental modification from external code.
The programming based around the use of custom objects is called object-oriented programming.
let variable = "Hello World!";
console.log(variable.search("World"));
// STRING OBJECT "variable" USING "search()" METHOD TO LOCATE A WORD.
6
Propertiy & Method
Property and method refer to a variable and function encapsulated to an object, which is accessed by the following syntax:
| Components | Syntax |
|---|---|
| Property | instance.property |
| Method | instnace.method() |
Custom Object
Developers can create a custom object and use it.
For a method in a custom object to access its properties or other methods requires this keyword. The keyword is an operator that represents the current object itself, and the interpreter would recognize these properties as variables instead.
/* CREATING A CUSTOM OBJECT: BEFORE ES6 */
const variable = {
    /* PROPERTY (similar to VARIABLE) */
    property1: value1,
    property2: value2,

    /* METHOD (similar to FUNCTION) */
    method: function(arg) {
        statements;
        return this.property1 + this.property2 - arg;
    }
};
var property1 = value1;

/* CREATING A CUSTOM OBJECT: AFTER ES6 */
const variable = {
    /* PROPERTY (similar to VARIABLE) */
    property1,
    ["property2"]: value2,

    /* METHOD (similar to FUNCTION) */
    method(arg) {
        statements;
        return this.property1 + this.property2 - arg;
    }
};
Class
A class creates objects (aka. instance) and is defined using the class keyword. Definitions of an object’s properties and methods are also inside a class definition. The following example is a simple user-defined class with properties and methods:
/* CREATING CLASS */
class CLASS {
    /* PROPERTY */
    property1 = value1;
    property2 = value2;

    /* METHOD */
    method(arg) {
        statements;
        return this.property1 + this.property2 - arg;
    }
}
The new keyword is necessary to create (or instantiate) an object from a class. The example below instantiates two instances from a single class.
const variable1 = new CLASS;
const variable2 = new CLASS;

console.log(variable1.property1);
console.log(variable2.property2);
value1
value2
Constructor
A constructor is an essential method for creating an instance. The method executes automatically on instantiation and determines the number of required arguments.
/* CREATING CLASS */
class CLASS {
    /* CONSTRUCTOR */
    constructor(arg1, arg2) {
        this.property1 = arg1;
        this.property2 = arg2;
    }

    /* METHOD */
    method(arg) {
        statements;
        return this.property1 + this.property2 - arg;
    }
}
A constructor is defined as below by default; hence does not need to be defined separately.
/* CONSTRUCTOR: DEFAULT DEFINITION */
constructor() {}
Static Method
A static method is a method accessible without instantiation, declared by the static keyword. However, an instance cannot access a static method. In other words, a static method is just another function bounded by a class.
class CLASS {
    /* STATIC METHOD */
    static method(arg) {
        return arg * arg;
    }
}

console.log(CLASS.method(3));
9
Setter & Getter Method
A setter and getter divide a single property in a class into two methods for assigning and accessing value, respectively. The set and get keyword declares a setter and getter method, hiding a sensitive part of the code but still accessible by end-users.
class CLASS {

    /* SETTER METHOD */
    set method(arg) {
        this.property = arg * arg;
    }

    /* GETTER METHOD */
    get method(arg) {
        return `Property: ${this.property}`;
    }
}

// INSTANTIATION
const variable = new CLASS;

variable.method = 3;
console.log(varible.method);
Property: 9
By defining methods for setting and getting value individually for a CLASS.property property, managing and accessing the property becomes more flexible.
Class Expression
The class expression defines a nameless class and instantiates at the same time. Although it shortens the code as it does not need the new operator, the class can only instantiate once.
/* OBJECT DECLARED BY CLASS EXPRESSION */
const variable = new class {
	constructor(arg1, arg2){
        this.property1 = arg1;
    	this.property2 = arg2;
    }
}
Object Type
An object type can create multiple objects of the same type using a function, just like a class. While a class uses a constructor to instantiate, an object type uses a (constructor) function instead.
/*  OBJECT TYPE DEFINITION USING A FUNCTION */
function OBJTYPE(arg1, arg2) {
    /* PROPERTY */
	this.property1 = arg1;
 	this.property2 = arg2;

    /* METHOD */
    this.method(arg) {
    	statements;
        return this.property1 + this.property2 - arg;
    }
}

// INSTANTIATION
const variable = new OBJTYPE(value1, value2);
Inheritance
Inheritance is an act of class providing properties and methods to another, where former and latter is called a base class and derived class.
A derived class specifies which base class it inherits from with the extend keyword. Use the super keyword to access properties and methods of the base class from a derived class. For a constructor, use the super() method.
/* CREATING BASE CLASS */
class BASECLASS {
	constructor(arg1, arg2) {
    	this.property1 = arg1;
        this.property2 = arg2;
    }

    method(arg) {
    	statements;
        return this.property1 + this.property2 - arg;
    }
}

/* CREATING DERIVED CLASS */
class DERIVEDCLASS extends BASECLASS {

    /* "super()" METHOD FOR CALLING CONSTRUCTOR FROM THE BASE CLASS */
    constructor(arg1, arg2) {
    	super(arg1, arg2)
    }

    /* OVERRIDDEN BY DERIVED CLASS METHOD IF METHOD SHARES THE SAME NAME */
    method(arg1) {
    	statements;
        return (this.property1 + this.property2) * arg;
    }

	method2() {
        /* `super` KEYWORD FOR ACCESSING BASE CLASS PROPERTY AND METHOD */
        let temp = super.method();
    	statements;
    }
}
Built-in Object
Most of the commonly used objects are already built inside JavaScript. Below introduces some of the well-known and useful built-in objects in JavaScript.
Math Object
The Math is a built-in object in JavaScript for mathematical calculation and has certain constants as its properties.
| PROPERTY | EXAMPLE | DESCRIPTION |
|---|---|---|
E |
Math.E |
Euler’s constant. |
PI |
Math.PI |
Constant Pi. |
LN2 |
Math.LN2 |
Natural log of the value 2. |
LOG10E |
Math.LOG10E |
The base 10 log of Euler’s constant. |
The Math object also provides methods for the calculation.
| METHOD | EXAMPLE | DESCRIPTION |
|---|---|---|
abs() |
math.abs(-3) |
Absolute value. |
sqrt() |
math.sqrt(36) |
Square root. |
power() |
math.power(x,y) |
Value of x to the power of y. |
random() |
math.random() |
Random number between 0 and 1. |
Date Object Type
The Date object type creates a date-related object for measuring time, checking date, calculating days, and so forth.
/* INSTANTIATION: CURRENT DATE AND TIME (NON-REALTIME) */
var dateName = new Date();
Passing an argument designates the date and time for the variable. There are three different valid arguments for the object type as follows:
| ARGUMENT | EXAMPLE |
|---|---|
| Milliseconds (since 1970) | new Date(789971670000) |
| Date string | new Date("January 13, 1995 13:34:30") |
| Y, M, D, H, M, S, MS | new Date(95,0,13,13,34,30,0) |
The object type also has methods for date and time calculation.
| METHOD | EXAMPLE | DESCRIPTION |
|---|---|---|
getFullYear() |
dateName.getFullYear() |
Gets the year from stored date in dateName. |
getMonth() |
dateName.getMonth() |
Gets the month from stored date in dateName. |
getDate() |
dateName.getDate() |
Gets the day of the month from stored date in dateName. |
getHours() |
dateName.getHours() |
Gets the hour from stored date in dateName. |
DOM
JavaScript contributes to various dynamic features for webpages when used with HTML and CSS. HTML declarative language presents its document as a tree-structured Document Object Model (DOM).
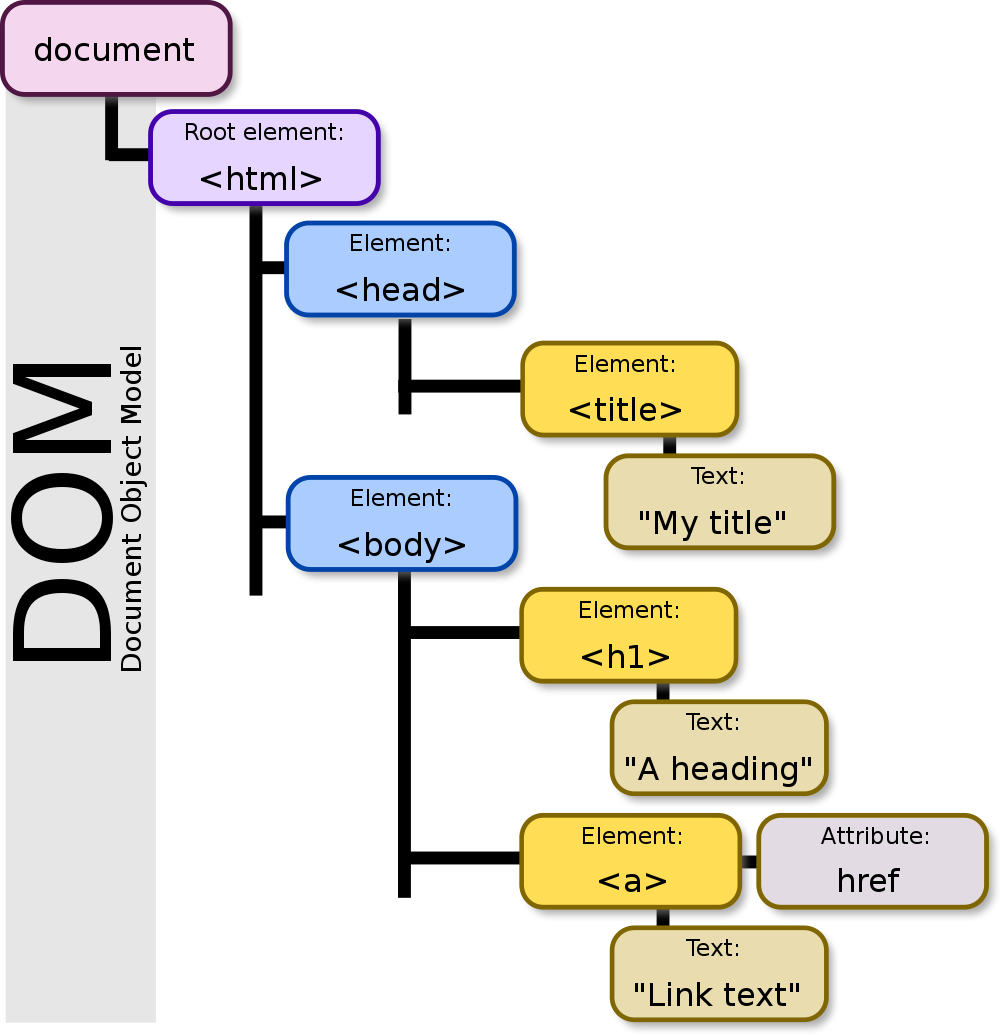
JavaScript can present a dynamic and flexible website by adding, removing, and modifying an element via accessing the DOM of HTML. Each block in the tree-structure is called a node in the DOM and represents an HTML element.
This chapter will briefly introduce the integration of JavaScript to HTML & CSS for practical web development.
Node Relationship
Each HTML element, such as <html>, <head>, <h1> and more, is a node of the DOM. Nodes have a relation with other nodes like a family: parent, child, and sibling.
| RELATIONSHIP | DESCRIPTION |
|---|---|
| Parent | Node that is directly enclosing it. |
| Child | Node that is directly being enclosed by it. |
| Sibling | Nodes that share same parent. |
document Object
A built-in document object accesses the nodes in the DOM with top-most authorization. Node creation, style modification, and event configuration are all done using the document object.
Selecting Element
The document object can select HTML element(s) in the DOM using the methods below:
| SYNTAX | DESCRIPTION |
|---|---|
getElementById("ID") |
Access the element ID of ID. |
getElementsByClassName("CLASS")[index] |
Acquire an array of element of the same CLASS class (not a class in JS). |
getElementsByTagName("DIV")[index] |
Acquire an array of element of the same DIV tag. |
The document.getElementById() does not return as an array since the ID attribute in HTML has a characteristic of uniqueness that can only be assigned to a single element.
The selected element can access its parent, child, and sibling nodes with the following methods:
| PROPERTY | EXAMPLE | DESCRIPTION |
|---|---|---|
parentNode |
node.parentNode |
Returns the parent node of an element. |
childNodes |
node.childNodes |
Returns an array of an element’s child nodes. |
firstChild |
node.firstChild |
Returns the first child node of an element. |
lastChild |
node.lastChild |
Returns the last child node of an element. |
hasChildNodes |
node.hasChildNodes |
Returns true if an element has any child nodes, otherwise false. |
nextSibling |
node.nextSibling |
Returns the next node at the same tree level. |
previousSibling |
node.previousSibling |
Returns the previous node at the same tree level. |
Changing Element Style
The DOM considers each element as an individual object; access attributes of an HTML element using the same syntax for properties of an object.
<!-- SAMPLE HTML -->
<div id="SAMPLE">
    <img src="path/to/image1.png" style="width:400px; height:300px;">
    <span>Figure 1. sample image</span>
</div>

<!-- JAVASCRIPT -->
<script>
    /* ACCESSING ARRAY OF CHILD NODE OF ELEMENT OF "SAMPLE" ID */
    const node = document.getElementById("SAMPLE").ChildNodes;

    /* SELECTING <IMG> ELEMENT, THE 0TH CHILDREN, AND MODIFYING ITS STYLE*/
    node[0].src = "path/to/image2.png";
    node[0].style.width = "800px";
    node[0].style.height = "600px";
</script>
Creating Element
JavaScript can create a new element without editing HTML.
| METHOD | DESCRIPTION |
|---|---|
createElement("DIV") |
Create a DIV element but not yet allocated within the DOM. |
createTextNode("String") |
Create a text node with String written but not yet allocated within the DOM. |
Due to the reason described in the table, the created element won’t show on a webpage yet. HTML element appears on a webpage when added to the DOM.
Adding & Removing Element
Adding an element to the DOM is done using the following methods:
| METHOD | DESCRIPTION |
|---|---|
appendChild(node) |
Place the node as its child node. |
insertBefore(node1,node2) |
Place the node1 as a child node right before existing node2 child node. |
insertAfter(node1,node2) |
Place the node1 as a child node right after existing node2 child node. |
Removing an element to the DOM is done using the following methods:
| METHOD | DESCRIPTION |
|---|---|
remove() |
Remove the currently selected node. |
removeChild(node) |
Remove the node child node. |
<!-- SAMPLE HTML -->
<div>
    <p id="P1">First paragraph.</p>
    <p id="P2">Second paragraph.</p>
</div>

<!-- JAVASCRIPT -->
<script>
    /* APPEND TEXT NODE TO NEWLY CREATED PARAGRAPH ELEMENT */
    const textNode = document.createTextNode("New Text from JS.");
    const paraNode = document.createElement("p");
    paraNode.appendChild(textNode);

    /* ADD PARAGRAPH ELEMENT AS A CHILD NODE OF THE DIV ELEMENT */
    document.getElementsByTagName("div")[0].appendChild(paraNode);
</script>
Events
JavaScript can make a function executed when an event occurs, such as mouse click, keypress, submitting a form, and more. Although HTML is the one that detects events, JavaScript is the one that defines an event handler that executes code for those events.
There are several ways of adding an event handler: one of them is directly determining what event to detect in an HTML source code.
<!-- SAMPLE 1 -->
<div>
    <!-- <BUTTON> SIGNALS EVENT TO "functionName()" UPON CLICKING -->
    <button onclick="functionName()">CLICK</button>
</div>

<!-- JAVASCRIPT -->
<script>
    /* "functionName()" EVENT HANDLER */
    function functionName() {
        statements;
    }
</script>
A more flexible and dynamic way to execute events without disturbing any HTML source code is by using DOM of JavaScript.
<!-- SAMPLE 2 -->
<div>
    <!-- EVENT HANDLER WILL BE ADDED ON THE DOM -->
    <button>CLICK</button>
</div>

<!-- JAVASCRIPT -->
<script>
    /* DEFINE AND ASSIGN AN EVENT HANDLER FOR THE <BUTTON> USING THE DOM. */
    const variable = document.getElementsByTagName("BUTTON")[0];

    /* "functionName()" EVENT HANDLER */
    variable.onclick = () => {
        statements;
    }
</script>
The addEventListener() method is another way to add an event and possibly define its event handler using the DOM. Beware, the name of the events are not identical to the previous approaches.
| METHOD | DESCRIPTION |
|---|---|
addEventListener("click",funcName) |
Add an event handler funcName to an element when the click event occurs. |
removeEventListener("click",funcName) |
Remove an event handler funcName from an element for the click event. |
<!-- SAMPLE 3 -->
<div>
    <!-- EVENT HANDLER WILL BE ADDED ON THE DOM -->
    <button>CLICK</button>
</div>

<!-- JAVASCRIPT -->
<script>
    /* EVENT HANDLER FOR THE <BUTTON> USING "addEventListener()" */
    const variable = document.getElementsByTagName("BUTTON")[0];
    variable.addEventListener("click", functionName);

    /* "functionName()" EVENT HANDLER */
    function functionName() {
        statements;

        /* REMOVE EVENT AFTER EXECUTION; MAKES A FUNCTION SINGLE-USE. */
        variable.removeEventListener("click", functionName);
    }
</script>
Event Propagation
Event propagation defines the priority order of event handlers. For example, suppose there is an HTML source code shown below:
<div onclick="functionDIV()">
    <span onclick="functionSPAN()">
        Hello World!
    </span>
</div>
When clicking the “Hello World!” text, which event handler is executed first: <DIV> or <SPAN>?
-
- Capturing
- event propagation goes down the tree structure of the DOM (
<DIV>first,<SPAN>later).
-
- Bubbling
- event propagation goes up the tree structure of the DOM (
<SPAN>first,<DIV>later).
Event propagation is configured by the useCapture boolean parameter in the addEventListener() method in . Default setting is useCapture = false for bubbling.
| EXAMPLE |
|---|
elem.addEventListener("click",funcName,useCapture) |
The useCapture is a boolean parameter that captures when true and bubbles when false. |
Repetitive Execution
JavaScript can repetitively execute a code periodically with setInterval() and clearInterval() pair.
| METHOD | EXAMPLE | DESCRIPTION |
|---|---|---|
setInterval() |
setInterval(funcName,millisec) |
The function funcName is executed on every millisec interval. |
clearInterval() |
clearInterval(setInterval) |
Disable repetitive execution of a setInterval() object. |
<!-- SAMPLE HTML -->
<div>
    <span>Hello World!</span>
</div>

<!-- JAVASCRIPT -->
<script>
    /* EXECUTE "functionName()" ON EVERY 0.5 SECOND */
    let variable = setInterval(functionName, 500);

    var index = 0;    // GLOBAL VARIABLE
    const functionName = () => {
        /* ON THIRD EXECUTION... */
        if (index == 3)
        {
            /* DISABLE REPETITIVE EXECUTION OF "variable" */
            clearInterval(variable);
        }
        else
        {
            statements;
            index++;    // VALUE IN GLOBAL VARIALBE IS RETAINED
        }
    }
</script>
The repetitive execution eventually animates a smooth transition of the HTML element by changing its style attribute.